
Saturday, December 24, 2011
Tuesday, December 20, 2011
Sunday, December 11, 2011
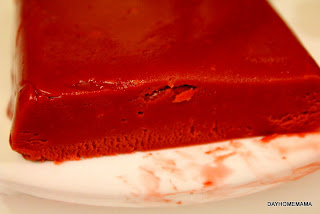
Never Fail RED VELVET fudge
In recent years, red velvet has become one of the most popular cakes, cupcake and flavours to serve for parties and events. I searched for the perfect red velvet fudge recipe, one that did not require me to be an expert or have special tools in my cupboard to get it done right. Luck for me, I am quite adventurous and decided to adapt a popular marshmallow recipe to re-create the cake into a special gifting Christmas treat.
 You can find the recipe with the link or by clicking on the image. I have added it to the new friendscookbook, where you too can add recipes and share them with you FB friends.
Cheers and enjoy the sweets!
Viviana
I'll be joining in these linky parties:


Cheers and enjoy the sweets!
Viviana
I'll be joining in these linky parties:
Thursday, December 8, 2011
Wednesday, December 7, 2011
Tree 2011, it's up!!
Our Christmas tree is up. This year we decided on a masculine one again, with lots of metal ornaments and chocolate ribbon. If you want to see a video on how we did it come visit my YouTube Channel and learn.
Have an awesome day!!

 Cheers,
Viviana
Have an awesome day!!


Viviana
Monday, December 5, 2011
Armed Chinese Troops in Texas!
Imagine, people need to open thier minds up to what has really been going on.
Burned Edge Blossoms and More
Just showing off. I will have these on sale at the Santa Claus Breakfast this Saturday (at the Winston Heights Mountview Community craft sale) and then on Monday at the Calgary Dollars Market Bazaar (at the Bow Cliff Seniors Centre)....thanks for looking.

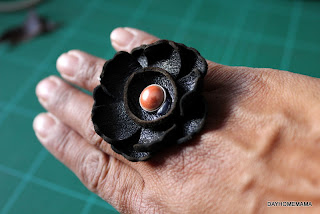


There are many more! If you want, take a look at my tutorial on how to make some of these gorgeous blossoms, easy and fun!
Cheers,
Viviana
 |
| Reusable cup cozy/sleeve, real leather, recycled! |

 |
| Pretty rings and brooches. |


There are many more! If you want, take a look at my tutorial on how to make some of these gorgeous blossoms, easy and fun!
Cheers,
Viviana
Tuesday, November 29, 2011
Sunday, November 27, 2011
The Verdict- Home Made Liquid Laundry Soap
After using it for 2 weeks, here is my results.
1. Laundry doesn't smell like chemical "spring meadows", it smells just clean and fresh.
2. The dark's were clean, the red and pinks were clean, the whites where brighter than usual.
3. The kitchen linens and towels came out specially fresh smelling.
4. 10 gallons of liquid soap=160 loads!!
It turns out there is a really great reason why this liquid soap works so well here; we have extremely hard water full of minerals, the washing soda and borax both help with softening it so it works better at removing dirt and grime. The kitchen towels generally have a slight musty smell, but after two washes, they no longer have it either, yay! The store bought liquid detergent is really not made for our type of water and even though it does make your clothes smell "clean", they sometimes have to be put through two cycles before they look clean.
I also love that I haven't had any itching issues, which I have regularly with clothes washed in commercial detergent.

 |
| Laundry soap, the bar says it's made in Dominica. |
 |
| Pool softener, aka: washing soda. 4.99 at Canadian Tire. |

Considering how I only spent money for the washing soda, the price for this is right up my alley. I has laundry soap bars I brought back from Guatemala, they are old but soap does not go bad (it just looses moisture slowly), I also had the borax since I bought 2 boxes back when David was in cloth diapers. I ended up buying pool water softener for 4.99 for a kilogram (Superstore was out of washing soda but it's back on the self today), it is soda ash and the same thing just cheaper if it's for your pool?!
The whole thing is super easy and I will never buy commercial detergent ever again! So the verdict is that it works and I love it using it.
I'm sharing the video I got the recipe from. Anyhow, try it out, specially if you have hard water in your area. You may just be happy to save some $$ and the bonus is really clean clothes.
Cheers,
Viviana
I'm sharing the video I got the recipe from. Anyhow, try it out, specially if you have hard water in your area. You may just be happy to save some $$ and the bonus is really clean clothes.
Cheers,
Viviana
Saturday, November 26, 2011
About Love
This is about something that happened a few months back, but I need to share because it is significant to me, as it should be as a parent.

We all are in a rush, and in this world we live in, there never seems to be enough time to just stop and breathe, to slow down and look around and really see the little things that make life big. Unfortunately, my life sometimes is like that of many, and although I work at home, I still tend to run ragged, trying to stay on task to get the kid up out of bed, get him fed and watered and off to school, get the kids back, change diapers, take to the bathroom, more feeding, get them napped, pick up again etc.
I normally don't go up the stairs alone unless it is to go pee, I'm usually running up with a kid in my arms to make it to the bathroom before any accidents happen. When I go up though, I don't turn on the lights on the stairwell, I make a mad dash and sometimes even pee in the dark!
One one particular day, I happen to turn on the light and actually make my way up looking at my surroundings, paying attention to the details, when I found this written on my wall: I LOVE MOM.
 A small gesture from my son, a tiny detail in the grand scheme of things, but such a touching tribute to the love he has for me.
 When I asked him about it later that day, he said "Oh, I wrote that on there in the summer" (it was early October when I discovered it)....and yes it did bring me to tears (privately, so I did not make him think I was disappointed in him). I was not at all disappointed in him, he said he wrote it in pencil so it would wash off, I was more disappointed in myself for not noticing it sooner. Is this what my life has become? So I made myself promise to slow down, stop and pay attention, see the world with the eyes of a child, admire the wonder and enjoy those little things that make this life a good life.
Yes, the words are still there on the wall (I just took that picture this morning) and some days, I sit on that step and admire those 3 words, they mean the world to me and obviously, I mean the world to the amazing little author.
Cheers,
Viviana

We all are in a rush, and in this world we live in, there never seems to be enough time to just stop and breathe, to slow down and look around and really see the little things that make life big. Unfortunately, my life sometimes is like that of many, and although I work at home, I still tend to run ragged, trying to stay on task to get the kid up out of bed, get him fed and watered and off to school, get the kids back, change diapers, take to the bathroom, more feeding, get them napped, pick up again etc.
I normally don't go up the stairs alone unless it is to go pee, I'm usually running up with a kid in my arms to make it to the bathroom before any accidents happen. When I go up though, I don't turn on the lights on the stairwell, I make a mad dash and sometimes even pee in the dark!
One one particular day, I happen to turn on the light and actually make my way up looking at my surroundings, paying attention to the details, when I found this written on my wall: I LOVE MOM.


Yes, the words are still there on the wall (I just took that picture this morning) and some days, I sit on that step and admire those 3 words, they mean the world to me and obviously, I mean the world to the amazing little author.
Cheers,
Monday, November 21, 2011
Working on a new video!!
So sorry I've been off the grid for weeks, but I have been very very productive in that time. I've been working on quite a few projects actually; Christmas comes too fast and this year I will be prepared, I may even get my cards mailed out by the first week in December. So, I've been making cards and tags, working on more hair accessories and brooches for my craft shows, making my own liquid laundry soap, rebinding my SMASH book for which I will make a video too, and working on a video of my Configurations Christmas box. I'm posting just a couple sneak-a-peeks before the video goes up. I still have some work to do and editing is a time consuming effort, but I'll work diligently while the kids nap and maybe I will have it up in the next few days.
In the mean time, for your viewing pleasure!
So tune in later on in the week, to see the finished product on my You tube channel. In the mean time, keep warm and stay scrappy happy!!
Cheers,
Viviana
In the mean time, for your viewing pleasure!
 |
| I dug into my trove of scrappy Christmas bits and bobs. |
 |
| Everything is from last year or older, I like to make use of what I have rather than buy new stuff! |
 |
| As you can see, I do not like to follow direct instructions, I did my own thing! |
Cheers,
Viviana
Sunday, November 20, 2011
Monday, October 31, 2011
Tis' The Season to be Spooky!
You will need black cardstock, 8.5 x 11 (standard), a ruler, pencil, glue, tape and the die cut shapes from the dollar store.
  |
| Got it at Michael's, you need 1 sheet for every 5 strips |
 |
| I made the strips slightly curved and about 1.5" wide. |
 |
| Dollar store foamy die cuts, perfect for this project. |
 |
| As you can see, I just rigged the whole thing with tape. |

 |
| I added a bit of scrap paper on the back of the eyes too, just because it looked better. |
 |
| Can you guess?? BRAINSSSS! Thereis a story behind this too. |
 |
| David is going as Dorothy's scarecrow and I am Dorothy....he needs a brain, that's where the brain cupcakes came in. |
 |
| Frankie and his bones! |
Anyhow, we had a great time and there is only 4 cupcakes left!
Happy Halloween!
Thursday, October 20, 2011
BBQ Pulled pork in the crock pot
There are days when cooking is really not in the cards, but I really love to try to make supper at home most days, even when on a very tight schedule. The Crock Pot is my life saver! BBQ pulled pork has got to be the easiest of the recipes out there, since you can pretty much throw in all the ingredients, run away for 8 hours and have a perfect meal ready when you come home. I've tried a few recipes, but finally came up with one I can throw together with what we almost always have in the fridge and pantry.
Ingredients:
3-4 lb pork roast trimmed
2 medium sized onions thickly sliced
1 1/2 cups of apple juice
1/4 teaspoon ground cloves
1/4 teaspoon all spice
1/2 teaspoon cumin
1/2 teaspoon garlic powder or 1 teaspoon garlic salt
1 cup BBQ sauce of 1 cup ketchup and 2 tablespoons of molasses
I basically put the sliced onions on the bottom of the crock pot, put the roast on top of the onions, then sprinkle and cover with the rest of the ingredients covering with the BBQ sauce last. Set on high for 8 hours or low for 12, depending how long you plan to be away I suppose, cover and walk away. It's done when the meat basically can be pulled apart with a fork. Drain some of the juice/fat from on top if there seems to be too much. You can pull apart right in the pot or transfer it into a serving dish and the add some of the sauce at the bottom. Serve on buns or totillas, coleslaw and pickles make good sides, but you can have any salad and veggies, whatever makes you smile.
Enjoy,
 Viviana
Ingredients:
3-4 lb pork roast trimmed
2 medium sized onions thickly sliced
1 1/2 cups of apple juice
1/4 teaspoon ground cloves
1/4 teaspoon all spice
1/2 teaspoon cumin
1/2 teaspoon garlic powder or 1 teaspoon garlic salt
1 cup BBQ sauce of 1 cup ketchup and 2 tablespoons of molasses
I basically put the sliced onions on the bottom of the crock pot, put the roast on top of the onions, then sprinkle and cover with the rest of the ingredients covering with the BBQ sauce last. Set on high for 8 hours or low for 12, depending how long you plan to be away I suppose, cover and walk away. It's done when the meat basically can be pulled apart with a fork. Drain some of the juice/fat from on top if there seems to be too much. You can pull apart right in the pot or transfer it into a serving dish and the add some of the sauce at the bottom. Serve on buns or totillas, coleslaw and pickles make good sides, but you can have any salad and veggies, whatever makes you smile.
Enjoy,

Friday, September 30, 2011
Fall Morning in the City.
Can you believe the view out my bedroom window? In the city no less! Using my Canon Rebel and having a very cooperative morning sunrise, the images turned out amazing. I think the key is to get as much back light as possible, the trees are so old and tall that no real roof line is visible, even though I am basically the heart of the city.
The settings I used were simple, it was on Manual, I had the ISO set at 100, the F stop set at 5.6 , the White Balance set to Shade. I put it on the tripod and voila! Now the key was that it was looking like an intense sunrise judging from what we had yesterday, so I was prepared. The rise happens so fast and if you fool around trying to set up, you may miss the best part unless you wake up 30 minutes before it happens.

 |
| This one is my favourite shot. |
 |
| As the sun came up, the colours got more intense and the skies seemed to darken slightly before the sun broke over the horizon, amazing beauty! |

 |
| I changed the setting slightly (WB back to Daylight) and it lost it's intensity. |
 |
| I took these from the front door, just before the l ight got intense. |
 |
| The Hollyhocks out front. |
Using the Rebel is easy, it just takes some playing around....the beauty is in that not having to worry about how much film I use, I can concentrate on taking lots of pictures to get the perfect shot.
Cheers,
Viviana
Wednesday, September 28, 2011
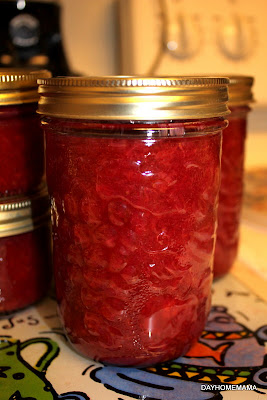
JAM, JAM, JAM, YUM!
As if I don't already have tons to do everyday, I've been making the jam for the year ahead (I stopped buying jams 5 years ago) during quiet and nap times, since it's usually a 2 hour process. At least, I've got it down to that from a 5 hours it used to take me when I first started! This time of year is abundant, plums and apples are our faves, and nectarines and peaches are awesome too. I used to cringe at the amount of sugar most recipes call for, until I discovered POMONA'S pectin, a life saver!! You can use very little sugar and still have your jam or jelly set, and you can double or triple and adjust your recipe to how you like it. The jam doesn't set crystally (is that even a word?), it's more opaque, but it tastes heavenly fruity! I personally don't like jam that you have to break up in the jar to be able to spread it on toast, I prefer more of a fruit preserve that you can spoon onto toast or cracker or spoon over a scoop of vanilla icecream.
Today's jamming adventure was a strawberry plum mix that tasted better than I imagined, and set beautifully with 12 cups of fruit and mere 3 cups of sugar.
The ingredients go as follows:
8 cups of fresh hulled and split strawberries
4 cups of chopped black plums
1/2 cup lemon juice
3 teaspoons calcium water
3 cups of sugar (or equivalent sweetener)
3 teaspoons of Pomona's pectin
You'll need to sterilize jars, depending on the size, I generally prefer to use 500ml jars, so you need about 8 to 10. Follow the general cooked jam directions in the Pomona's package or look them up on their website. Now this is the type of jamming and canning I like.
 The recipe is workable and doesn't have to be 100% exact. The processing of the jam filled jars though is more technical and you do need to make sure you process them long enough to kill any bacteria and to hinder anything from growing in the jar in storage (check elevation and process times accordingly). After a few tries, you sort of get really good at it.
I have now made Strawberry Rhubarb (not my favourite), Spicy Blueberry (AWESOME), Black Plum (Super Delish!), Strawberry Plum (Amazing)....getting ready to make Blackberry Nectarine next, and maybe some Caramel Apple Butter too.
 If you all have any questions or would like the recipes (all big batch recipes I'm afraid) just message me or comment and I will do my best to answer them. Thanks so much for stopping by and have a great fall!


 |
| You can really see it is set soft and full of fruit! |

 |
| This is my Jam shelf in the pantry, full of delicious goodness! |


Subscribe to:
Posts (Atom)