Friday, November 22, 2013

1 lonely Pancake done Paleo.

There's hundreds of blogs out there with fantastic recipes for pancakes, gluten free pancakes and even grain free pancakes, paleo pancakes; most are fabulous and most make enough for 2-6 servings. I wanted to figure out a good recipe, one serving, or lonely pancake for me. I generally eat breakfast alone, and paleo can get extremely boring if all you have are eggs and meats for breakfast. I do make my own almond meal and I don't  blanch for the extra fibre, but you can use blanched almond flour. Although this recipe does have an egg, it is for one cake, a lonely little pancake .... It's so I personally don't over eat, or have a stale pancake for the next day...nobody wants to eat the stale pancake! 

So, the list of ingredients is short, if you already eat paleo, you should have all the ingredients in your cupboard. 

2 tablespoons almond meal/flour. 
1 tablespoon coconut flour
1 teaspoon tapioca flour (optional)
1/4 teaspoon baking powder 
1 med egg (you can use large and omit the water)
1-2 tablespoons water (if batter is too thick) 

1 teaspoon butter 

Heat butter in a ceramic pan at just past med heat, until bubbly melted. In a small bowl mix all ingredients well until all dry ingredients are incorporated. Add butter to batter mix well and drop all batter onto hot pan spread evenly. At this point you can add blueberries, bacon, currants, banana slices or whatever you want to the pancake.  Let it cook at med heat until top start to set and pancake has risen a bit you, flip and continue cooking. These cook slower than regular an cakes, button out light and fluffy. Enjoy with maple syrup or homemade paleo blueberry spread....or plain. This makes a perfect one pancake serving, keeps calories down and reduces food waster (chucking out the stale pancake) .... I hate wasting food! And I'm thrifty...those who read my blog already know!! 

Cheers, 
Viviana.

P.S. I would post a picture, but you all already know what a pancake looks like and....well, I sort of like to eat my food hot, so I have ended up eating the lonely pancake before he gets his portrait taken. 

Saturday, October 12, 2013

Paleo Gravy Done Right!

I recently made a smashing good seafood chowder, it was thick and favour full, and you'd think 96246 calories, but not with my altered version. Thanks to the fabulous cauliflower, I now have successfully created a creamy thick base for soups and gravies, and I'm in love with food all over again. Hmmm, when was I not in love with it?? Oh yeah, back to carbs and grains....


So, the base recipe is simple.... I cauliflower, cut into chunks, 3 cups of water or stock, I yellow onion cut into chunks too, and one veggie stock cube if using water. Boil it all together, with a lid, until cauliflower is mushy. Run through the blender, in portions, until smooth and creamy. Now, this makes a lot, so you can freeze it in several containers for later use. 

As for the gravy.... Take the drippings, your cauliflower cream, and the herbs and spices you would normally add to your gravy and cook together until warmed through or the consistency you're looking for. This gravy doesn't get thicker or gluey when it stands for a while , and it doesn't get goopy and it doesn't breakdown and lose it's thickness. It's Gluten Free!!!  I used it for sausage and gravy over paleo biscuits, my son couldn't tell it was not regular flour gravy, he hated the biscuits though ( you can't win them all )... That says a lot. I used it for roast, and added a couple drops of Browning to darken it slightly. I plant to use it for turkey gravy for our Thanks Giving on Monday. Oh, and mushroom soup, which my son has requested again....I love requests from him! 


Cheers and Happy Thanksgiving! 
Viviana


Saturday, September 21, 2013

Deodorant update.

love my pits! I used to hate them...they were dark, ugly, bumpy and sometime got very stinky ( when I gave up commercial deo's) and I would have to go wipe every few hours to keep the stench at bay.
I've been using an easy homemade recipe for about two years now and I find it easy and effective. The only frustrating thing about it always was how hard it was in the dead of winter and how runny it got in summer. I revised the recipe several times, and I think I found the perfect mix, although its one more ingredient, it's totally worth trying for a very easy and body safe deodorant. My skin is more supple, there are no ingrown hairs, they don't stink either!

2 tablespoons coconut oil (just melted)
2 tablespoons baking soda
1 tablespoon sweet almond or olive oil
3-4 tablespoons of arrowroot powder
15 drops of tea tree oil
10 drops lavender of ylang ylang ( optional )

Mix it all together to a paste, put in a babyhood jar or a metal tin and use a small pea sized amount in each pit! Your body heat will melt it and help you keep the bacteria under control. Your ph might have to be adjusted, as an acidic body could cause a rash as it reacts with the alkalinity of the deo. 


Enjoy and let me know how it worked for you.

Cheers,
Viviana

Tuesday, August 13, 2013

Harvest time, Cherries!

After a few years of watching my tree grow, slowly and with little hope because of the soil and climate, we have cherries!! Imagine my delight when I arrived home from Cuba, to find ripe and ready cherries hanging delicately under the branches of my little tree. Yes, it doesn't seem like a huge harvest, but it is for us considering that last year I had 6 cherries and none all the years before. Yay. They are slightly tart, but honestly, very tasty and perfect for us. If anyone has recipe they might want to suggest, I would love it.


Thanks for reading and sharing my little thrill!

Cheers,
Viviana

Monday, August 12, 2013

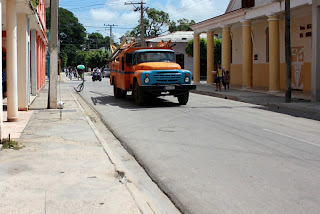
Cuba, I am in love.

I'm just posting some of the pictures of the amazing beauty that is Cuba and it's people.


I will post a few more in a few days, so you all can see how amazing Cuba really is. People are happy, no one is starving, everyone has clothes and food and lives harmoniously. I felt safe there, unlike Mexico, crime is almost non existent in Cuba. They have no need for it. I HEART Cuba!

Cheers,
Viviana


Thursday, June 6, 2013

Testing- The Oil Cleansing Method

I've been hearing it everywhere...The Oil Cleansing Method, the way to go for perfectly beautiful glowing skin. I decided to look it up and maybe test it. My skin, as of late, has been prone to breakouts and deep cystic pimples that seem to throb and pulse and make me feel like hiding under a rock. I never had skin issues as a teen, maybe a pimple here or there, but I had very clear skin throughout. It stinks to have acne in my 40's.
I found a few sites, suggesting oils that include castor, olive, sunflower, almond, jojoba and coconut oils. Some recipes suggest you mix 2 or 3 types, each recipe explaining why each combination will work. after exploring for a few days, I bought castor oil. I decided to mix it like this:

1 tablespoon of castor oil, 1 tablespoon of coconut oil (melted) and 2 tablespoons of extra virgin olive oil.
I mixed them and put it in a baby food jar, we have a surplus of those around this house.

I followed these instructions right from a site called The Cleansing Oil Method .

  • You'll need a soft washcloth, your oil blend, and hot, running water.
  • Pour a generous puddle of oil into the palm of your hand. Roughly, the size of a quarter, but more is acceptable. Rub your hands together to warm the oil and smooth over your face.
  • Begin massaging the oil into your face. This will remove makeup, dirt, and other impurities, so there is no need to use a makeup remover or wash your face prior to the massage. I've found that this removes even my stubborn waterproof mascara and concealor.
  • Using slow, firm motions across the skin, massage the oil deeply into your pores. Take your time and focus on your problem areas. You want the oil to work into your pores so that blackheads and the like can be dissolved and steamed away.
  • As you're massaging, let your mind drift off to something calming and breathe deeply. Take this time to relax and release some of the stress that your body is harboring. Sit down, breathe deeply, and take your time. Give the oil enough time to work on dissolving the impurities in your pores and give yourself enough time to unwind. Picture what your face would look like if it were completely clear and free from blemishes. Focus on that image and know that it is attainable. Trust that it is attainable. Accept that it is attainable. You can have clear skin, free of blemishes and you will have clear skin, free of blemishes. Focus on perfect skin and breathe deeply.
  • Once you're satisfied that your pores are saturated and you're feeling calm, pick up your washcloth and soak it in clean, steamy water. We want the water to be warm enough to open your pores and remove the oil. Cool water will not open your pores, nor will it remove the oil efficiently. We're not scalding our skin, we're steaming to coax our pores to release the oil carrying the impurities. We're essentially steaming our skin as an esthetician would, but without the luxury of a steam machine.
  • Hold the washcloth to cover your face. Allow it to stay until it cools. You will feel your pores releasing the impurities. Wipe the oil gently away and rinse the washcloth well in hot, running water. Hold the washcloth to your face again, allowing it to cool. Wipe gently, rinse well, and repeat two or three more times. Avoid any temptation to scrub, as you'll find it's completely unnecessary and your skin will be soft, smooth, and free of flakes without the additional manual exfoliation and irritation that will result. Impurities, dead skin cells, and bacteria will be gently swept away.
  • Have no fear of the oil, as the steamy washcloth will remove it. The Castor Oil, though it is an oil, will help with the removal of the other oils, as well. It is our main cleansing oil and is easily removed with warm water.
  • If your skin feels tight, take a tiny drop of your oil blend, rub it between your clean, damp palms and pat it onto your damp skin. Gently massage any oil residue into your skin so there is no film of oil left sitting on the surface. Your skin should now glow!
I did this for 3 weeks and found my skin to look fresh and clear, considering it was winter time, I felt like this method worked really well on my skin. The t-zone looked clear and the pores were minimized, my skin was more supple and felt very smooth. I had some cleansing cloths left over, so I decided to finish using those up, and didn't do the oil cleansing for about a week....HORROR! I pretty much within 3 days had a huge bunch of big fat deep pimples on my chin under my lip, on my nose by the bridge and nostrils, on my laugh lines, and a few on my forehead!! This has been the worst breakout of my life. I tried to use the salicylic acid creams I have and it seemed to make them worse, then I had to use polysporin on them to keep them infecting (my zits are terrible for that) and as the scabs and ooziness has died down, I have gone back to oil cleansing every day. Somehow, they skin has dried up and healed nicely and although I have some scars they are fading fast. Now, if you ask me...the oil cleansing seems to work better for me than the cleansing cloths and zit creams.

I cleanse at night and dab a tiny bit of oil in the morning under my makeup. The oil seems to pick up and get any makeup out of the pores, plus it breaks down the oil already in them, and it seems to me that there's some antibacterial action going on there (Coconut Oil ) to dry up my zits nicely.
I love the sweet smell it leaved on my skin too. This method may not be for everybody, but it if fantastic for my combination 40 year old skin.

Cheers,
Viviana

Thursday, May 16, 2013

Peanut Butter Mini Cakes, freakin' yummy!

So I have been trying new recipes with this wonderful peanut flour/powder that I found at Low Carb Canada. It is called Protein Plus Peanut Powder (there are others like Byrd Mill or PB2 which will work just as well) and it comes in a 1 lb bag for approx $8, it has tons of protein and no sugar or salt added, so it is versatile to work with. It has become part of my daily diet (almost) as I add it to my morning smoothie,I went off this recipe, I doubled it and used peanut powder instead and I omitted the heavy cream. I did mine in 3 mini cake molds and sprayed the tins (oiled with a pump oil sprayer) so they were super low fat, I might try it again with regular peanut butter when I make them for Davy. They were delicious though!! Doubling the recipe made 3, I didn't want them to overflow.

2 tbsp of peanut butter (2tbsp peanut powder/2tblsp H2O)
1 tbsp sugar (brown sugar!)
¼ tsp baking powder
1 tbsp heavy cream
1 large egg

Bake in a preheated oven for 12-15 minutes until tops are brown and they are no longer bubbling.
I had mine with vanilla frozen yoghurt (made by me in our ice cream maker), Joanne, you will love them!! They are not carb free, but low card enough, and if you really wanted to, you could use splenda or stevia for the sweetness. I have added cinnamon to the latest ones, yummo!!!


Enjoy and let me know how they turn out.

Monday, April 15, 2013

Zombies

Still laughing at this. Are you obsessed with zombies? It seems like the thing to be.... So this, from cyanide and happiness, gives me hope, hahaha!

Tuesday, March 26, 2013

My Sister's Dream Project!

I am publishing this little article for my sister, She wrote it, and wants to share with all of you, her wonderful little project!

The first time I came to Nicaragua I came to do market research for a business proyect I was thinking about. I spent about 7 months here and fell in-love with the country and its people and the way of life. It is not a touristy place like Costa Rica, or full of amazing ruins to climb like Guatemala, it is still vastly un-touched by modern comforts and this appealed to me.
The transition between ubber-geek-love-my-lap-top-what-will-I-do-with-out-Internet-chick into the person that now finds it part of daily life to cook with wood or deal with the fact the electricity went out or that we are going to stay somewhere without electric power or water, was challenging to say the least. However I have discovered that I amaze myself at what I never thought possible and how easy it was to adapt.
So making the decision to move here permanently and open and B&B was both the easiest and the hardest decision ever.  I thought it was going to be smooth, come with a marketing plan and lets get it done! NOT! From the moment I left I was presented with challenges, the hardest one was finding out at the airport on the way here that my business partner had to back out and I was on my own.  Sink or swim used to say a mentor I had and I decided to swim!
I landed in Managua with less then a ½ of the money planned and came straight to Leon. The first few days I thought I couldn´t catch my breath, was it stress or the heat? It was hard to tell. I have always been fortunate to have angels that come in different forms and this time it was in the form of my friend Rigo. Rigo helped me get organized, get out there and start looking at places to turn into our B&B, he argued with every local in town looking for the best pricing on everything, we made lists and checked them twice, slept on the floor when we found a place to save the hotel money for investing into our plans.
It blows my mind away what we accomplished in 4 weeks; we are now ready to start booking guests, we are still working on some projects but have 4 bedroom suites with private bathrooms available for weary travellers looking to hang out with locals and an ex-pat Canadian. Posada la Gordita as it is becoming know is open for business.


Located in the heart of the colonial Zaragoza district of central Leon, Nicaragua, Posada la Gordita offers a home away from home, with comfortable beds, clean rooms, private and shared bathrooms and breakfast included. 


We are close to everything, bars, restaurants, markets, supermarkets, parks, ice cream shops and within walking distance of all the tourist attractions. Our rates go from $25/night in a room with a shared bathroom including breakfast, free WIFI, coffee all day, linens and towels, use of fridge, TV, cable and much much more.
Check out our site at www.posadalagordita.com
Email us and enquire about our weekly rates.

Cheers,
Viviana

Tuesday, February 19, 2013

4th Batch, and still going strong!

So, I am not sure who remembers; I started making my own laundry soap back in 2011 and am now onto making my 4th batch. Yes it does last that long!
 
I have fine tuned the recipe, because of the hard water and washing with cold water (it's about 2 degrees away from washing with snow!!), I have slightly increased the amount of Borax to two cups and I use 1.5 bars of grated soap. the amount of water stays the same and so does the amount I use.
I have noticed that our clothes are as clean as ever, and when the whites seem dingy I just add some OXY clean.
My dad now shops in my basement for his laundry soap!
I will post a link to when I first blogged about this and in there is also the link to the video with the instructions. Depending on where you live, and the softness of your water, you can stick to the original recipe or increase the ingredients like I did.

http://dayhomemama.blogspot.ca/2011/11/verdict-home-made-liquid-laundry-soap.html

Enjoy the mountains of laundry, or at least the savings!!

Cheers,
Viviana

LinkWithin

Related Posts with Thumbnails